Sunday, December 11, 2011

Green Stuff Cloth Tutorial - Space Marines and Norman Horses

Redmanphill over at the Subject to Stupidity blog requested that I do a tutorial of how I do cloth out of greenstuff or brownstuff.  So if you don't like this tutorial, blame him.  Anyways I'll do this with two items that I'm converting that don't have anything in common, other than being miniatures:  Norman Horses and Space Marines.  So I have you 40k and Ancients guys both covered.  This is a relatively simple method to use, yields relatively simple looking cloth, and will not give you a cloth look with a lot of bubbles or fingerprints, unless your name is Tom Schadle.

First thing I need is a relatively good piece of plastic that the green stuff or brown stuff does not stick very well to.  That is generally a higher quality zip lock bag, not your typical thin plastic sandwich bag but something more industrial, or the film that they use to ship the two part GS in.  So here I have placed some water on the plastic, get it a bit wet.  Take some GS and flatten it out in between your fingers and get the basic shape.  Place that over the wet spot on the plastic.  Now we will smooth that out and get its thickness to a relatively consistent thickness.  To smooth out the GS, I will use tool number 1, that we so back in my Armor Plate tutorial.
 
Matter of fact we'll use tools #1, 2, 3, and 6.  In reality you only need a tool like #1 or 'c' and something that looks like a toothpick (a wet toothpick will work). 

Next I cut it to the desired shape. Use the color shaper or spatula end of a metal sculpting tool to further flatten the GS.  This one will be for the Norman Horse, a bit bigger piece than would be used for the space marine tabbard. 

Let it set up and stiffen 5 minutes or so.

Now if you use a small piece of plastic film, you could pick it up by the film and apply it to the miniature or peel the film off gently and apply it to the miniature. If you peel be aware of finger prints and its important to let the GS set up for a bit and stiffen. Once on the miniature you will need to manipulate it.

For this, I'm using a very good sized zip lock bag, so I will peel it off very gently with the xacto. 

Now I place it on the horse.


Here on the horse caparison I blended the upper edge into the horse body simply with my fingers. To do the blending moisten your finger and drag it across the GS until it blends smoothly into the plastic.
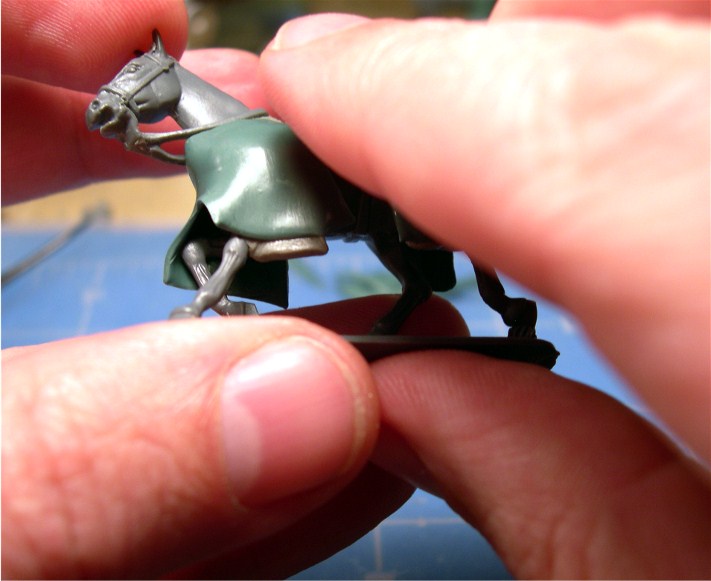


The further smooth out spots where my fingers don't fit, I use the tools and press and move the GS into those areas. 


I also need a crease in the center for the seem holding the caparison together.  I do that with the knife edge of the spatula tool.

Next I use the metal toothpick like tool, the conical color shaper, metal toothpick 90 degree bend, color shaper chisel point, or a bent wire tool to add creases or folds. You can also add folds by gently bending the GS into a shape.

The Space Marine tabard is very much done the same way.  Get the general shape.


Smooth out.

 Cut to shape.

Peel it off and I apply the piece of GS to the spot where the torso is glued to. 
On the above I used the tooth pick tool to make the 'V' coming off the pelvic area.  Below I added a few more creases with the tools, and then added a torso to make sure everything blends in.

Wow.  Long post.  Next time I'll show how I do drapings off shoulder pads and legs of the spacemarine, when I begin my space marine project.

Thursday, December 8, 2011

Old Ford Pick-up Progress

Like all my projects, a little bit here, a little bit there....

New stainless headlight bezels and sealed beams, sure changes the look of the front end. 

Wednesday, December 7, 2011

Old Stuff Wednesday - December ... Cerulean Templars vs. Nurgle

A long long time ago (circa 2004) Mike Butcher and I played this epic game of 40k in a local store, with tons of miniatures on the board, nearly every last one of them converted in some manner. I don't really remember the outcome other than I lost, but I took a number of photos.  Most all of the pics are after the unpacking.  Dig the craziness of the conversion work. Nothing like throwing down with really cool miniatures.

 He's phat.


 Help me!


Tuesday, December 6, 2011

Piecing Together My Return to 40k

The pieces are forming in my head.  I have lots of leftover Templar bits and some Dark and Blood Angels bits.  In order to build this army, I’m going to be using as much of the left over stuff as I can.  So how best to combine all of this?  I’ll do a winged cross as the icon, sort of Affliction T-shirt inspired in design, I remember some cool Icons that they had on some of the shirt designs that I had seen a long time ago watching some MMA fights.  So the icon is settled, as is the color scheme in red and white.  Now I need to do some icon sketches to get it right.  I’ve found two Forge World Dreads, a Vindicator, couple of Rhinos, and a partial Land Raider kit when I was packing and unpacking.  I ordered some bases from our little buddy over at Dragonforge, which should arrive later this week.  And I have two 1/32 scale Tanks that have actual rolling chassis that I plan to convert into Predators.   

Now I need a name for my DIY Chapter of winged crosses.  Suggestions?

Sunday, December 4, 2011

Gripping Beast Plastic Viking Hirdmen Review

I’ll preface this with that I have not been a very big fan of Gripping Beast’s miniatures in the past, especially their medieval line of metals, but that opinion has been fixed with an introduction to their plastics. Gripping Beast’s plastic Viking Hirdmen have been out for quite some time, but this is the first opportunity that I have had to work with them. I first saw them when one of our locals Ancients players modeled a few up for a Viking army,  and I thought they looked like a fairly nice kit, so my newest WAB project centers around them as a future army. Since they are fairly new to me, I thought I would give a brief review of them to give people an idea of what they may be getting into.

Review of the Sprues

Here we see the basic infantry sprue, lots of options for heads and weapons. The sprue is another Renedra sprue from GB’s creation, much like I have seen recently with the Perry’s, Warlord Games, and Conquest Games. The details are crisp and the quality is as good as anything that I have seen from Games Workshop or Warlord Games or the Perry’s, etc. The parts are arranged well and are quite easy to remove, with the exception of the tabs under the stand, but those are in a location where you can get a bit brutal removing them. So far I have not had any issues with flash. The flash is very minimal, even on the mail armor covering the bodies.


They also come with this command sprue, shown below. The bodies on the command sprue are the same as the infantry, but the heads are different and of course it has some special items for your command and DIY characters.

Value

Talk about bang for your buck, this kit is one of the best for that. I picked mine up at Avatar’s of War (good to deal with people out east, check out their blog in my blog-list) for $32 and you get 44 miniatures. That’s an awesome deal for this high of quality.

Models
# of Heads = 60
# of Head Variations = 11

As always with me, I am a converter and hobbyist, and this is normally one of the things I complain about is head variations. I have not mastered sculpting heads yet so I need to rely on the companies giving me enough variations to work with. GB has certainly done that and then some on this kit. There really is only a couple of the heads that I don’t care for and even then those are not that bad. This is a supreme effort on their part and one I’ll definitely commend them for. The detail like on everything is very sharp. For me the one thing I will want, is some more un-helmeted heads as they give some nice character to the army. I’ll need to experiment with a few things and see about doing some head swaps.

# of Bodies = 44 (Outstanding)
# of Body Variations = 5
Good variations and large number of bodies is excellent. One of my criticisms for the kit though is that most of these appear to be squatting slightly. I’m okay with it. Kind of reminds of 40k Space Marines. I’ll get over that though. The detail like on everything is very sharp. And they have a large amount of weapons to select from which is really good. They are fairly easy to assemble in a variety of poses, below are some of the variations that I came up with, without even trying, just getting use to the kit and seeing what can be done.

Scale
Now comes the really fun part, how do they look compared to other miniatures. The following are comparison shots with other miniatures, and I have also included some Fantasy GW range models for those of you thinking about Warhammer Fantasy. The models from left to right are as follows:
Warlord Games Barbarian,  Perry Norman, Gripping Beast Plastic Viking, Conquest Games Mounted Norman, Gripping Beast Metal Viking, Warlord Games Roman Auxilary.  All fairly comparable in size.

And for our Fantasy Buffs out there a comparison with Games Workshop models: Red Box Games Aenglish warrior, Empire Flaggelant with Ungor head, Gripping Beast Viking, Ungor with Flaggelant Head, Chaos Marauder, and another Gripping Beast Viking.

Overall I really love this kit. I use to think that Games Workshop (even though they have had their fair share of flops) was the absolute, no questions asked, best in the business when it came to plastic kits. That is no longer, Gripping Beast, Warlord Games, Perry Miniatures, Victrix, and upstart Conquest Games are all stepping up to the plate and hitting homeruns in my book. The future looks bright for historicals.

Saturday, December 3, 2011

Movement Tray, Part 4 and Forest Litter Basing Tutorial

Finishing up my movement tray tutorial, onto the flocking of the trays and showing of my techniques for also obtaining a forest litter. So in reality this is a two for one tutorial.
Items needed:
· Bases and Movement Trays, ;)
· Sand or Model Railroad ballast
· Italian Seasoning, the type without any powders
· Glue: White Glue, Elmers Glue, Super Glue
· Thin or Fast Super Glue (Consistency of Water)
Pictured below is one of my new Red Box Games marauders, another gorgeous Tre Manor sculpt, with a blank base. For these examples I’m going to use Gorilla Superglue simply because it will cure quicker than White Glue or Elmer’s Glue. 

I applied the glue to the base and spread it using a toothpick, added a fake rock, and then applied an HO Scale Model Railroad Ballast as the flock. Then I simply tipped the base and cleaned off the excess.

Next I take the Italian Seasoning. Apply a pinch of it randomly here and there on the base. Then you use the Thin or Fast Super Glue and apply some drops of it over the Italian Seasoning.
< I RECOMMEND YOU WEAR EYE PROTECTION!!>> Definitely be aware of my warning, this glue has a lot of accelerant in it and if gets on exposed skin it will be warm to hot. It will almost instantly stick your eye lid to your eye ball if you get it in your eyes. I know someone this has happened to, wear glasses or goggles.   Also make sure as always with superglues that you have adequate ventilation. READ ALL OF THE WARNING LABELS.   Now that is out of the way, a drop here and there over the seasoning will do two things, stick it to the base and reinforce the seasonings herbs to where they can hold up to a drybrushing of paint later.

After that is done, tip the base and remove the excess, and you get what is shown below.
 
And with the movement tray it is just a bigger version of the base. So the final look is what is shown below.


After that is up to you to do the painting. Most of the time with the seasoning I will stipple and drybrush 3-5 colors on it for the Warriors of Chaos, to get the end product as shown in the pic below.

There you have it, how I do my movement trays and how I do a forest litter basing.

Friday, December 2, 2011

Horus Heresy All is Dust....

Finally picked this book by Graham McNeil back-up.  A story about the 1000 Sons and the witch hunt by the Emperor of Mankind.  The central character is Ahriman and his back is against the wall pretty much the whole time. 

I won't go into a lot of detail so as not to ruin the book for people.  I'm not a book reviewer, and I did sit this book down for a month or two as I was just too busy to sit and read a bit.  It was a good story like most of the Horus Heresy books that are written by Graham and Dan Abnett.  It definitely furthers the depth of the realm of Warhammer 40k.

It also gives me a very different impression of the 1000 Sons, not the traiterous type impression that I previously as them being a legion of chaos, but of a persecuted legion.  And the story also gives me a much more dislike of Leman Russ and the savagery of Space Wolves, they are definitely the Emperor's dogs and enforcers.  Don't get me wrong I like the idea of the wolves, but a story like this does give a different perspective.  And I still love the visual side of them, they are the Vikings of 40k.  And like that sort of thing.

This book, also, does the blur the lines, everything is not completely black and white in the 40k Mythology.