
First thing I need is a relatively good piece of plastic that the green stuff or brown stuff does not stick very well to. That is generally a higher quality zip lock bag, not your typical thin plastic sandwich bag but something more industrial, or the film that they use to ship the two part GS in. So here I have placed some water on the plastic, get it a bit wet. Take some GS and flatten it out in between your fingers and get the basic shape. Place that over the wet spot on the plastic. Now we will smooth that out and get its thickness to a relatively consistent thickness. To smooth out the GS, I will use tool number 1, that we so back in my Armor Plate tutorial.

Matter of fact we'll use tools #1, 2, 3, and 6. In reality you only need a tool like #1 or 'c' and something that looks like a toothpick (a wet toothpick will work).


Now if you use a small piece of plastic film, you could pick it up by the film and apply it to the miniature or peel the film off gently and apply it to the miniature. If you peel be aware of finger prints and its important to let the GS set up for a bit and stiffen. Once on the miniature you will need to manipulate it.
For this, I'm using a very good sized zip lock bag, so I will peel it off very gently with the xacto.

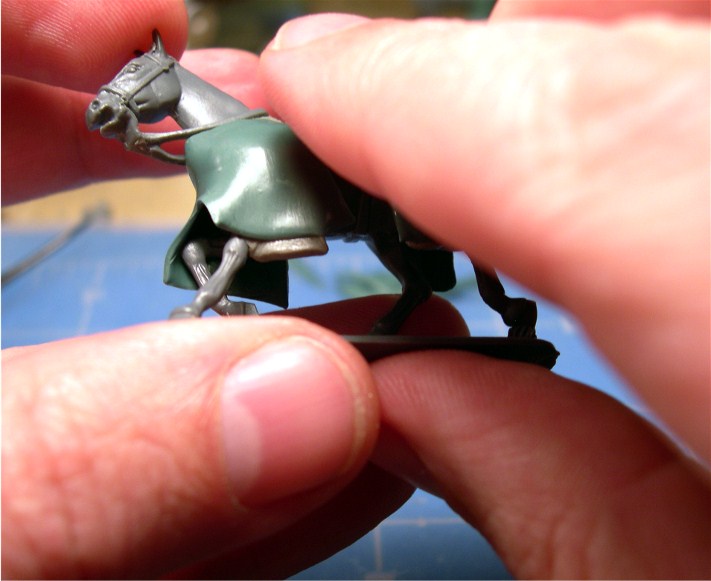
Now I place it on the horse.

Here on the horse caparison I blended the upper edge into the horse body simply with my fingers. To do the blending moisten your finger and drag it across the GS until it blends smoothly into the plastic.

The further smooth out spots where my fingers don't fit, I use the tools and press and move the GS into those areas. 

I also need a crease in the center for the seem holding the caparison together. I do that with the knife edge of the spatula tool.

Next I use the metal toothpick like tool, the conical color shaper, metal toothpick 90 degree bend, color shaper chisel point, or a bent wire tool to add creases or folds. You can also add folds by gently bending the GS into a shape.


Smooth out.


Peel it off and I apply the piece of GS to the spot where the torso is glued to.

On the above I used the tooth pick tool to make the 'V' coming off the pelvic area. Below I added a few more creases with the tools, and then added a torso to make sure everything blends in.

Wow. Long post. Next time I'll show how I do drapings off shoulder pads and legs of the spacemarine, when I begin my space marine project.
Thanks for the tutorial; I'll be referring back as needed. I've used Green Stuff before, but mainly hit or miss with whatever I have available - toothpicks, pins, etc. Much better with proper tools, I see! Best, Dean
ReplyDeleteThanks this will be great. I know I will be referring back here a good bit for this. Please don't blame me either.... I am guessing we will all benefit from your benevolence!
ReplyDeleteThanks guys.
ReplyDeleteJust seeing if you are awake redman. lol.
Tools are important Dean. When I first started I just used a bunch of toothpicks and needles for tools and could not get things smooth. I picked up a poor man's Wax #5 and soon realized I needed better tools. Color Shapers were another ephinany.
The biggest keys to this is do not rush, and keep everything wet, tools and plastic. Do not wet the model that you are applying to. Keep the model dry.
Great tutorial, thanks! will be trying this out soon.
ReplyDeleteThis comment has been removed by the author.
ReplyDelete